
Instagram How-To for SAA Members
Intro
Though the following instructions can be used by anyone to add posts to Instagram, this was specifically written for members of the Sudbury Art Association and are the opinions of the writer from years of using Instagram but is far from being an expert.
Keep in mind, Instagram changes periodically and these instructions are valid as of June 2024
Why Should I use Intagram?
Before jumping into Instagram, think about your reasons for doing it. Some good reasons to join:
You want reach a larger customer base and sell through Instagra
You enjoy sharing your art
You want to use it to get people to come to your craft fairs and/or stores where you sell and buy from you locally
You want to share how you make things just cause its fun
You want to get feedback about your art
You just think you should because everyone says you should
What kind of content should I be sharing
This is really about your brand and what you want to portray to the Instagram world.
Some people like to share their process and therefore like to show how they make their art
Some people like to only share pictures of their completed work
Some people like to share everything about their daily life, their work both in progress and completed
What you do is really up to you and what kind of audience you want to build.
What you share is visible in your feed. For example, in this feed, there is a combination of events, work in progress and completed photos.

Videos vs Photos
You have probably heard us say many times that videos are more likely to be seen then photos. This all had to do with the Instagram algorithm. The problem is that Instagram keeps that info private so we don’t really know if that is true anymore. It seems like it, but we have no proof that it is. So post what you like to post
When and how often should I post?
It is often said that you are more likely to have your post viewed if you post on a regular basis. Is that true? No idea. But if you have the content then posting once a day, twice a week or whatever works for you, is a good idea. Don’t over-post - multiple posts a day it totally unnecessary and might even annoy your followers.
What time of day should you post? Think about when you look at Instagram. These are some good times to post:
First think in the morning - say around 7am on a work day, and a little later on the weekends (this is my preferred time to post)
Lunchtime - there are definitely people who check their phones while eating lunch so this might be a good time
Around 7pm in the evening when people are winding down for the day
Create a post using one picture
Select the plus “+” sign to start a new post

By default, the initial choice is REEL (which is just a video). Click on POST

You should now see your photos. Scroll through and tap to select the photo you want to post. It should gray out when you select it and appear on the upper part of your screen just like in this example

At this point, you can change the way your picture looks. We are not going to go into this in detail and leave it for you to play around with
You can click on the Pen to change the intensity of your photo
You can click on the music note to add music to your photo
You can click on the Aa to add text to your photo
Down at the bottom, there are also effects you can select to change the way your photo looks
Select the Next button to continue

Here is where you add a caption to the photo. Some things to think about:
Is it obvious what is going on in the photo? If not, add something to the description saying what is happening. For example, in this photo, it’s not obvious that these are sponge holders so I added that to the description.
To engage your followers, as a question. I didn’t do that here but you could add something like:
which glaze is your favorite? which pattern do you like best?
Make sure you respond to your followers if they answer the question!
Add a location. Just another little bit of info that might engage your followers.

Hashtags! What are hashtags? They are a way to categorize your contents and make it easier to find. Why? People follow hashtags subjects they like. It is also a way for Instagram to figure out who to share your info with. How does this work? No idea. It’s something Instagram doesn’t share.
You can use up to 30 hashtags. It used to be the more you used the better. But that doesn’t seem to be the case anymore. Use what makes sense for your photo

How do you decide which hashtags to use?
Before you use a hashtag for the first time, there is a number next to it. That is the number of people that have previously used that hashtag. If it’s a very small number, then it’s not all that useful to use that hashtag. Same goes for hashtags that are really big. But I use them anyway. I try to have a mix of hashtags. Some very general, some more specific.
A good way to find useful hashtags it so go to people you follow that do what you do. See what they are using and try those out
It’s a good idea to switch up the hashtags and not use the same ones every time. You can repeat some but then use some different ones too.

There are more options that you can select but for now, just click the Share button and share your post!

Create a Reel/Video Using multiple pictures
A Reel is just a video. You can start with video that you already made or you can select a group of pictures and/or videos and turn them into a reel.
Click on the “+”

Reel is the default option

Find the first item you want to add and hold your finger down on it until the little circles appear. Then tap on each picture you want to add. Note: the order you select is the order the pictures will appear in. If you get the order wrong, you can deselect and reselect by tapping on the picture.
Click Next when you are done selecting items

Instagram will suggestion music for you and time your pictures to go with the music. You can scroll thru the suggestions and pick one.
Most of the item, this works. But sometimes, it shortens the display time for some of your pictures which might not be what you want. Watch the video and see if it works. If it doesn’t with any of the suggest music, click Skip. Otherwise, click Next

You now select the music note and change the music from the previous step or pick something else
Here is where you can add text by clicking on the Aa. Note: Any text you ad at this point will display for the entire vidoe

You can change the lettering, color and more by selecting the buttons a top and button of your photo. It’s a lot to go into so just play around until you find something you like
Click Done when you have entered your text

At this point, you can:
Move the text around by just putting your finger on the text and moving
You can also change the size of the text by using two fingers and moving them apart or together on the text
If you are all done, click Next
If you want to continue editing, click Edit

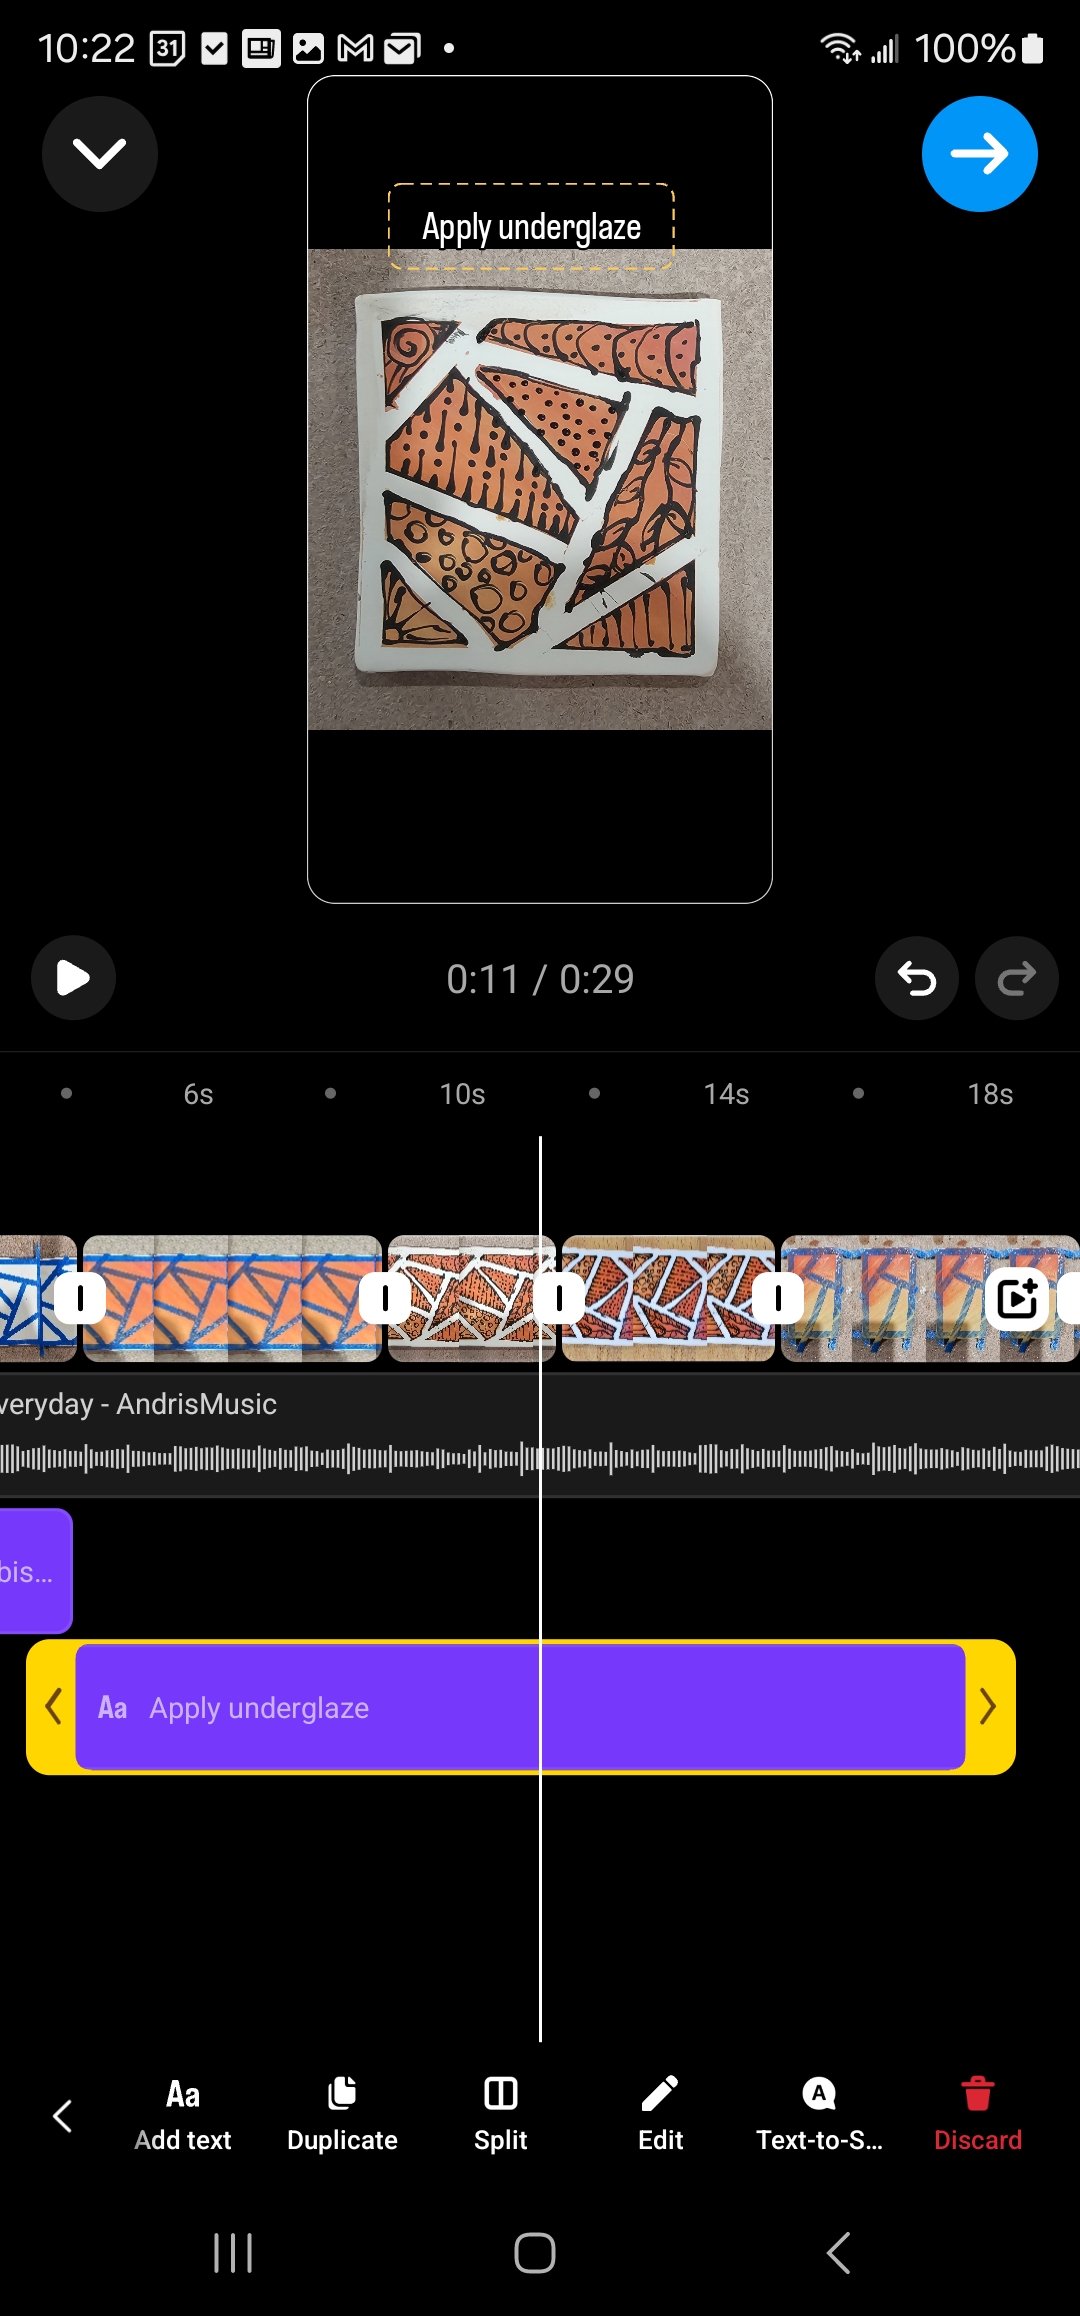
There is a lot you can do here. It can be a bit confusing at first if you have never used an editor that layers video, text and sound But if you play around with it, you can actually do a lot. Here I am just going to show you a few steps to add text for each picture instead of the same text for the entire video
Click on the Aa and type in some text
The text will spread out over the entire video. You can change the size of the text by moving the yellow edges. This part is tricky. You want resize it so it is only under the pictures you want it under. The little markers in between the pictures will help you figure out where to start/end the text.
When you are done, click the blue arrow top right

Add your location
If you are all done, click the Share button and your video will be posted
If you want to schedule the post for a later time, click on More Options

Click on the button to the right of Schedule this reel and Don’t let others use this reel as a template
You may get a pop-up that says some of your setting can’t be saved. The reason for this is that for some reason, right now, Instagram does not allow you to schedule a post for Facebook. If you have your Instagram and Facebook accounts tied together, schedule will still work for Instagram but it won’t push it to Facebook. If you are ok with this, just click on Continue scheduling.
If not, click Go back and then share your video… or save as a draft and post it when you are ready to post (not going to go into the details for that at this time)


Set the day and time
click Done

Click Schedule

Add to Stories
Stories are a temporary way to share information. It is only available for 24 hours. There are ways to save your stories in a separate folders but we are not going to go into that here. So think of these as being temporary stuff you want to share with your followers.
Some people use stories to share things about their day, or work in progress, or other people’s posts that they like. We use stories to share the work of our SAA artists
Stories can be videos or pictures. You can add music and text (and other stuff). We are not going to go into a lot of detail here since the steps we used in the previous two sections work the same with stories.
To create a story, go the the upper left where your face is and click on the ”+”

Click on any of editing options at the top of the picture if you want to do anything like add text or music
When you are ready to share, click on your face on the bottom left. If have your Facebook account linked to Instagram, it will share to both
